-40%
Audio Spectrum Indicator 30LED Colorful Music Level Voice Meter Waterproof Tools
$ 26.92
- Description
- Size Guide
Description
Audio Spectrum Indicator 30LED Colorful Music Level Voice Meter Waterproof ToolsItem Description
Product parameters:
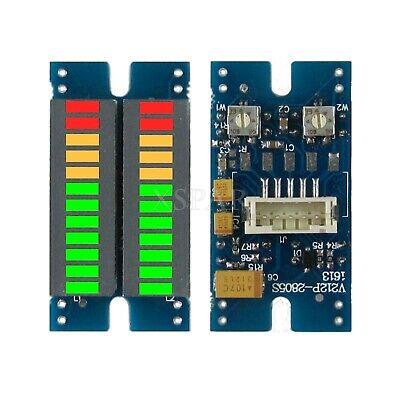
1. Motherboard size: length 60mm* width 40mm;
2. Light bar specifications: length 1 meter * width 12mm, line length about 1.2 meters, 30 lights per light bar;
3. Motherboard 5P socket: 5 lines, printed with letters on the board, 2 lines are 5V power supply lines (no more than 5.5V, current cannot be lower than 1A), 3 lines are audio signal lines (generally connected to the headphone jack, not connected Amplifier output or horn, too strong signal will cause damage);
4. The remote control is self-provisioned by the owner, has been paired with the motherboard, and can be used directly when received. It only uses the number 1-8 keys, a total of 8 keys, and the remaining keys are invalid. The key descriptions are as follows:
1. LED color selection +.
2. LED color selection-.
3. Display mode switch.
4. Sensitivity adjustment.
5. Lamp bead brightness adjustment.
6. Channel selection.
7. Customize the color of lamp beads.
8. Night light switch.
Instructions:
First, make sure that after the line is connected and powered on, the buttons and the remote control do not perform any operation. The lights on the light bar will light up and jump with the concert. This state is temporarily named: "level display state" It is explained based on this state.
All states:
1. Level display status.
2. LED display mode adjustment status: under "1, level display status", short press "K1" or remote control "key 3" to enter the next led display mode, each press will enter the next one, and then press after the end It will start from the beginning, and so on. When the operation is completed, it will be automatically saved within 5 seconds, and the mode will be displayed automatically when the next time it is opened.
3. Audio sensitivity adjustment state: under "1, level display state", short press "K2" or remote control "button 4" will enter this state, sensitivity points: 1 level automatic sensitivity and 5 level fixed sensitivity, this In the state, if 5 LEDs jump up and down, it indicates automatic sensitivity, and fixed sensitivity is the number of five LED lights that are always on, which indicates the level. Press once to lower the level, and then press again to automatically return to the top. First level, note that if there is no operation within 2 seconds in this state, it will automatically return to "1, level display state", and the sensitivity setting will be automatically saved after about 5 seconds.
4. LED brightness adjustment state: under "1, level display state", long press "K2" or press the remote control "key 5" will enter this state (left LED is all bright, right road shows the current brightness level, 3 The light indicates one level, a total of 10 levels) In this state, short press "K1" or remote control "key 1" brightness increases by one level, short press "K2" or remote control "key 2" brightness decreases by one level, after entering this state, if If there is no operation within 3 seconds, it will automatically return to "1, level display state" and automatically save the set brightness after 5 seconds, or press any button except the 1 and 2 buttons on the remote control will return to "1, level "Display status" and automatically save the set brightness after 5 seconds.
5. Channel selection setting state: under "1, level display state", long press "K2" to enter the brightness adjustment state, immediately release "K2", then long press "K2" again to enter this state or press the remote control Enter with "Key 6".
In this state, the lowest LED on the left represents the signal input from the left L of the circuit board, the second LED on the left represents the microphone input signal on the circuit board, and the lowest LED on the right represents the right on the circuit board For the signal input by the R line, the left half and the right half represent the left led and the right led. In this state, the two leds and the three corresponding signal input terminals will flash. If the led represents the signal and the light bar The LED will flash at the same time, indicating that this signal is connected to this light bar.
In this state, short press "K1" or remote control "key 1" or "key 6" to enter the next connection configuration, short press "K2" or "key 2" to enter the previous connection configuration, if in this state within 5 seconds Without any operation, it will automatically return to "1, level display state" and save the settings after 5 seconds, or in this state, long press "K2" or press the 8 setting buttons of the remote control except the "button 6" button Any one of the other 5 keys other than 1" "Key 2" can also directly return to "1, Level display status" and save the setting after 5 seconds.
6. LED color custom state: under "1, level display state", long press "K1" will enter "8, LED color preset selection state", then release "K1", then continue to long press "K1" to enter This state, or press the "key 7" on the remote control to enter this state (in this state, the two LEDs all display the custom set led color, the light bar is divided into three parts, the constant led light column led and the peak led) enter this The flashing LED after the status indicates that you can select the color by short pressing "K1" "K2" or "Key 1" "Key 2" on the remote control, some of which seem to be the same color change, in fact, the stepping is different, you can Let the two channels show the effect of asynchronous color change. In this state, long press "K2" or remote control "key 7" to switch the editing part. After editing on both sides, you can long press "K1" or 8 keys on the remote control Any one of the five keys except the three keys "Key 7, Key 1, Key 2" can save the color of exit and execute this setting.
7. Remote night light status: In this state, only the remote control can enter. Press "Key 8" of the remote control under "1, Level display status", all the LED lights are off, and then press the key "Key 1" "Key 2" To select the brightness of the LED, in this state, press the other 6 buttons other than the two buttons to select the brightness to exit this state (this state has no memory function, and it will return to the LED level display state after power-on again).
8. LED color preset selection state: LED color custom state: long press "K1" under "1, level display state" or press "key 1" and "key 2" of the remote control to enter this state, under this state Short press "K1" or "Key 1" on the remote control to enter the next preset color, short press "K2" or "Key 2" on the remote control to enter the previous preset color, no operation will be automatically performed within 3 seconds in this state Return to "1, level display state" and save the setting after 5 seconds.
9. LED lamp post and peak hold time falling speed adjustment state: short press "K2" to enter "3. Audio sensitivity adjustment state" followed by long press "K2" to enter this state, or remote control operation "key 4" to enter "3. Audio sensitivity adjustment state" and then immediately press the "Key 7" of the remote control to enter this state.
In this state, the left LED will jump to demonstrate the effect of the current setting. The right LED is divided into upper, middle and lower parts. The upper part is the peak hold time setting value display, the middle is the peak drop speed setting value display, and the lower part is the lamp post falling Speed setting value display, blue light will flash to indicate that the setting is in the editing state, you can switch the three editing states by long pressing "K2" or "Key 7" on the remote control, and short pressing "K1" "K2" or remote control "Key 1" and "Key 2" on the device to set the current edited value. After setting, long press "K1" or 8 keys on the remote control except "Key 7, Key 1, Key 2". Any one of the 5 keys returns to "1, level display state" to execute this setting and the setting value is automatically saved after 5 seconds.
10. Custom setting state of infrared remote control (this state can only be entered by key operation):First, press and hold "K2" for about 1 second under "1 level display status". After the LED display changes, release "K2" and immediately press and hold "K1" for about 1 second. All the LEDs will go out and enter infrared. Customize the setting state of the remote control, take the remote control and press 8 buttons in turn. Each press of a button such as infrared decoding succeeds, the corresponding LED on the right will light up. After completing 8 buttons, it will automatically Save the function of 8 buttons and return to "1, level display state".
11. Restore factory settings: If you feel that the settings are too messy, if you want to restore the factory settings, you can press and hold the button "K1" for about 8 seconds, all the LED lights will go out, then release the button Restore factory settings.
About the operation time of the key: short press = press time is greater than 0.1 seconds and less than 1 second (just press the button once). Long press = release after pressing for more than 1 second (usually the display of the LED will change after a long press, and release after seeing the change, the time is about just over 1 second).
If you are not satisfied during the setting process, you can restart after setting or press "K1" or "K2" to exit, and then re-enter this state to start, if you press the first button after entering this state If there is no response from the LED of the light bar, you can try again at another angle or distance. If you try multiple times without response, it is estimated that the remote control is not in NEC encoding format or the battery is invalid.
Package: 1 motherboard + 2 light strips + 5P plug-in cable + 1 remote control (without battery).
Payment
Please ensure your shipping address on your account is correct. If you have any address change, please inform us on the eBay note. All orders can be canceled until they are shipped. If your order has been paid and you need to change or cancel it, you must contact us within 2 hours. Once the packaging and shipping process has started, it can no longer be canceled.
Shipping
Once we have received payment, your items will be dispatched in 1-2 days. Delivery time 7-30 days. There may be some delays due to flight, holiday, weather, local post, local natural disaster impact. If your shipment delays or you have not received your order within 30 days from payment, please contact us. We will track the shipment and get back to you as soon as possible with a reply.
Return
We offer a 100% money-back guarantee on products that are defective or damaged during shipping. Just contact us with pictures of the damaged items. We will refund the full purchase price of your item and we will send a replacement or refund the full purchase price as preferred. We will refund you for items returned within 30 days of you receiving them, for any reason. To be eligible for a refund, your item must be unused and in the same condition that you received it. Customers will be responsible for paying shipping costs for returning items. It must also be in the original packaging. Before returning items, please contact us. To be eligible for a refund please contact us within 7 days of you receiving the item.


